What is Shading: Light-Matter interaction
Reading time: 14 mins.In this lesson, you will first learn what shading is and the different parameters that influence the appearance of objects, such as light intensity and direction, the orientation of the surface of objects relative to light sources, the color of objects, etc. Once these basic concepts are understood, we will explore a couple of very basic techniques for shading objects with and without light sources. We will then advance to studying more complex shading techniques such as reflection and refraction. Finally, we will learn how to make the surface of objects visually more appealing using procedural texturing.
This lesson serves as a basic introduction to shading. In this section, which is an introduction to rendering, we won't overwhelm you with the theory behind the science of shading. We will keep it really simple and informal.
Introduction to Shading
As mentioned in previous lessons, the rendering process can essentially be broken down into two steps: visibility and shading. We presented two techniques in the previous lesson to solve the visibility problem: rasterization and ray tracing. From this point on, we will focus on the second part of the rendering process: shading. Shading covers a broad range of topics. Some techniques used in shading can also be mathematically complex. However, in this lesson, we will only cover the basics of shading and provide you with an introduction to the simplest and most important or common shading methods. This will give you an overview of what shading is and the necessary background to delve deeper into the topic.
What is Shading?
What is shading, anyway? Shading is the process in rendering that involves computing the color of objects in a 3D scene. Rendering aims to reproduce the shape, visibility, and appearance of objects as seen from a given viewpoint. While the visibility part of the rendering process deals with shape and the visibility problem, shading is concerned with computing or simulating the color of objects as seen from a specific viewpoint. The viewpoint here plays a crucial role. In this chapter, we will see that an object's appearance can change with the viewing angle. The appearance also depends on obvious parameters such as the amount of light in the scene, the orientation of surfaces relative to light sources, and the objects' colors, among others. This chapter will review what contributes to defining the look or appearance of objects. Generally, the way things look has much to do with how light interacts with matter. The principles involved in this process are well-understood today and are easily simulated with a computer. Shading relies on these principles to simulate the appearance of objects in a consistent and realistic manner.
In computer graphics, a shading function is defined as a function that yields the intensity value of each point on an object's body, based on the characteristics of the light source, the object, and the position of the observer. - Phong, 1975.
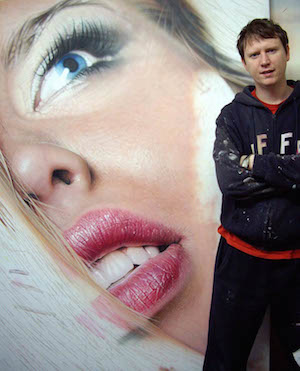
The level of photorealism in a painting depends on the artist's ability to reproduce the color of real surfaces on canvas as seen by the human eye. If photorealism is the goal, shading is concerned with reproducing the appearance or look of real surfaces with such accuracy that the human eye cannot distinguish between an image of the real world and the real world itself. The goal of Photorealistic Rendering is to produce computer-generated images that look real or resemble photographs. Shading, which defines the appearance of objects during the rendering process, plays a critical role in photorealistic rendering. On the other spectrum, Non-Photorealistic Rendering (NPR) focuses on creating or simulating various artistic rendering styles. NPR's goal may be to reproduce real artistic techniques such as oil or watercolor painting or to develop entirely new styles that can only be generated with computers. In the lessons from this section, we will focus exclusively on photorealistic rendering.
The distinction between shading and rendering, as in "the action of simulating with a computer the creation of images produced by real-world cameras," is often subtle. For example, in upcoming lessons, we will explore how to simulate effects like motion blur and depth of field, which, strictly speaking, are not directly related to shading. These topics don't quite fit with solving the visibility problem either and often fall into a grey zone related to rendering as a whole. Thus, the term rendering can also encompass anything not directly related to solving the visibility problem, including shading and effects such as depth of field, lens flare, motion blur, etc.
Setting Up Terminology

When images are generated by a computer, the color of each pixel in the image cannot be decided by the painter's eyes. Fortunately, the appearance of objects, which we aim to simulate in photorealistic rendering, is essentially the by-product of two main factors: lighting and the properties of the object. These factors and their interaction can be accurately simulated with a computer. Light is crucial in the visualization process; without light, objects cannot be seen. Generally, the more light there is, the brighter the objects appear. The properties of an object can be broadly categorized into two main types: the geometric properties of objects' surfaces (such as their orientation) and the properties that influence how light and objects interact (such as the object's color).
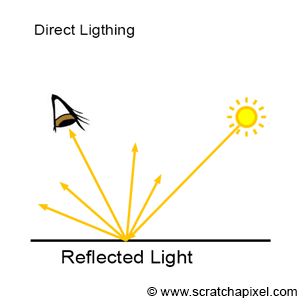
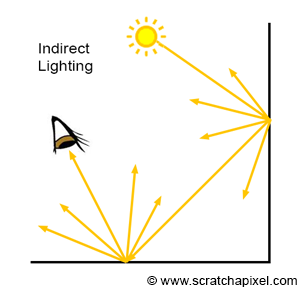
When we "see" an object, what we are actually seeing is light reflected off the surface of that object. Most objects do not emit light; instead, light typically comes from light sources, special objects with the property of emitting light (e.g., the sun, light bulbs, and candle flames). Usually, light is emitted by light sources, strikes the surface of an object (that does not emit light), and this object reflects some of that light towards the viewer (Figure 3). This reflected light forms the image of the object in our brains. In shading, this is referred to as direct lighting or direct illumination. However, since objects reflect light that falls onto them, it does not matter if this light comes directly from a light source or indirectly from other objects in the scene. When an object reflects light towards the surface of another object, which in turn reflects some of this light toward the viewer, we call this indirect illumination (Figure 4). Note that light can bounce off many surfaces before finally being reflected toward the viewer (Figure 5).
Light-Matter Interaction and the Essential Components of Shading: N, P, L, and V
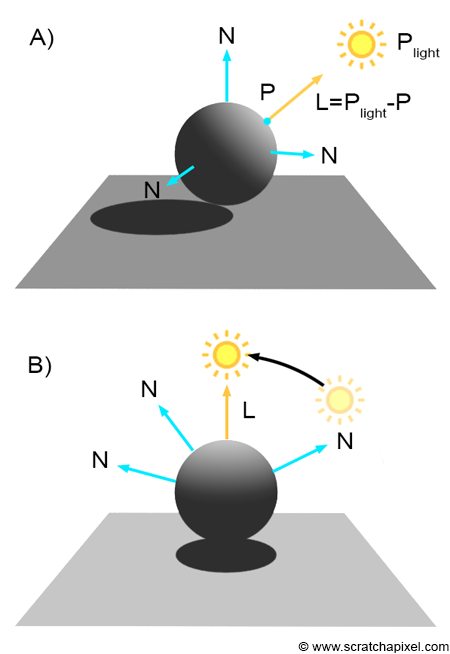
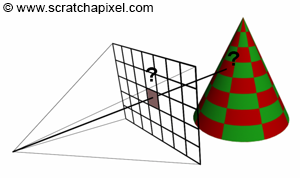
This introduction already gives us some insights into the process. What we perceive are not the objects themselves, but the light reflected off their surfaces. Light, essentially energy emitted by sources and reflected by object surfaces, plays a crucial role. As mentioned earlier, the orientation of surfaces significantly affects the amount of light reflected. It is a common observation that turning a surface towards a light source makes it brighter, whereas turning it away makes it darker. The surface orientation concerning light sources is crucial in shading. This is where the normal \(N\) at an object's surface becomes most useful. Altering the surface's orientation relative to the light or repositioning the light source relative to the surface has equivalent effects. The light direction \(L\) can be defined by drawing a vector from the point \(P\) on the surface, whose color we wish to compute, to the light source position. For now, we'll assume that lights are infinitely small points in 3D space. While we're yet to determine how to compute the color at \(P\), we understand it depends on \(P\), the point on the surface; \(N\), the surface orientation at \(P\) given by the surface normal; and \(L\), the light direction. What other factors are important?
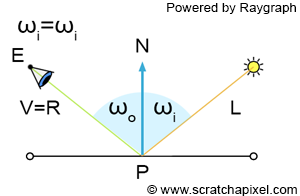
We've established that light is reflected off object surfaces. We will soon delve into how light is reflected, but let's first consider in which direction light is reflected. The incoming or incident light direction is the direction from which light strikes the surface. The angle this vector forms with the normal \(N\) at \(P\) is often denoted \(\omega_i\) and is known as the angle of incidence. Perfectly reflective surfaces, such as mirrors, reflect light similarly to how a tennis ball bounces off the ground. The outgoing direction forms an angle with the normal \(N\) at point \(P\), generally denoted \(\omega_o\) for "outgoing," and referred to as the angle of reflection. The law of reflection governs that for mirror-like surfaces, the angle of incidence is equal to the angle of reflection. Much of shading derives from this fundamental law, though it doesn't necessarily simplify things moving forward.
For surfaces that perfectly mirror, determining the outgoing light or reflection direction \(R\) is straightforward with basic geometry. The complete equation for computing this reflection direction will be covered in subsequent chapters.
Let's define the viewing direction \(V\), as the line joining point \(P\) on the object's surface and the observer's eye (\(E\)) or the camera origin, as depicted in figure 6. An intriguing observation is that if the observer does not look directly at \(P\) in the same direction as the outgoing light direction (i.e., if \(R \neq V\)), then the light ray won't enter the observer's eye. In other words, the observer "won't see the light ray or the image of the light source emitting that light ray." It will miss the observer (figure 7). This is a critical observation, and we will revisit it soon.


Few surfaces in the real world are perfect mirrors. Most surfaces exhibit some degree of shininess or glossiness, or they are matte or diffuse. While terms can be used interchangeably, in computer graphics (CG), diffuse or Lambertian are preferred terms for matte surfaces, and both will be explained shortly. The distinction between glossy and mirror-like or diffuse surfaces is that glossy surfaces are akin to "broken" mirrors. Their surface isn't perfectly smooth and resembles a collection of small facets acting as tiny mirrors oriented in somewhat random directions, as illustrated in figure 8. Consequently, light rays are reflected in slightly different directions than the ideal mirror direction, depending on the variance in facet orientations from a flat surface. The greater this variance, the more the reflected rays will diverge from the mirror-like direction, enhancing the surface's glossiness.
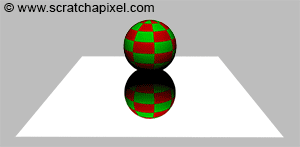
The result of rays being reflected in directions other than the mirror direction is a blurring of the reflected image. In other words, a blurred reflection on an object's surface indicates that the surface is rough, scattering light in various directions rather than in a single, mirror-like direction. The rougher the surface, the blurrier the reflection, as shown in figures 9 and 10.
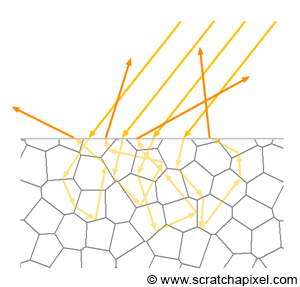
Diffuse materials are often considered the antithesis of perfect mirrors. While it might be tempting to associate the diffuseness of materials with roughness, the cause of their diffuse nature is generally not related to surface roughness. Instead, diffuse materials often possess complex internal structures that cause incident light rays to become "trapped" and bounce multiple times within the material before eventually exiting. This repeated internal reflection causes the exit direction of light rays to be uncorrelated with their incident direction. In CG, it's common to model the exit direction as random. For example, 100 rays hitting a small area around \(P\) with the same incident direction generally result in fewer than 100 rays exiting the surface in random directions, with some rays possibly being absorbed by the material.
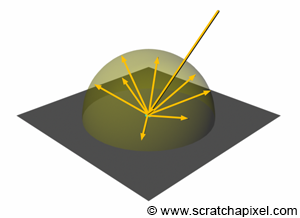
For this particular reason, diffuse objects are viewed as reflecting incident light equally in every possible direction within the hemisphere centered around \(P\) and oriented about the normal \(N\) at \(P\), as illustrated in figure 12. This fundamental difference in how glossy and diffuse materials respond to light is crucial. Since diffuse materials reflect light equally in all directions, their brightness does not change with the view direction, unlike glossy materials. This view dependency is crucial in understanding reflections. If the view direction and the mirror reflection direction are not the same, the reflected ray does not enter the eye, and thus, the image of the light source is not seen. Similarly, the image reflected by a mirror changes as the viewer's perspective with respect to the mirror changes. Reflections from glossy surfaces (reflections by rough surfaces) are view-dependent. The perception of an object or light source reflected by a glossy surface varies with your viewing angle. In contrast, diffuse reflections are view-independent; their brightness remains consistent regardless of the viewing angle, due to the equal distribution of reflected light in all directions. This distinction is evident when observing glossy and diffuse objects in your surroundings and noticing how their appearance changes or remains constant based on your viewpoint.
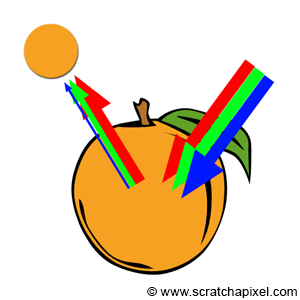
The last aspect of shading we'll touch on briefly is why objects have color and how we simulate it. While a comprehensive discussion on color and color perception is beyond the scope of this lesson, it's worth mentioning the basics. "White" light is composed of all colors in the visible light spectrum. When white light hits an object, some colors are absorbed while others are reflected. The specific spectral colors absorbed by an object are determined by the material's properties. For example, an orange fruit appears orange because it absorbs most of the blue light, leaving red and green light which, when mixed, produce orange. This phenomenon can be quantified as the ratio of reflected light to incident light across different colors, a concept known as albedo. In the case of an orange, assuming an RGB color system, this ratio might be 0.1 for blue, 0.6 for green, and 0.9 for red.
Summary
This chapter provided a quick overview of the basic principles of light-matter interaction, establishing the terminology for shading. Understanding how light is reflected by objects, including the role of the law of reflection for perfectly flat, mirror-like surfaces, is foundational for simulating photorealistic images.
Terminology
-
P: The point that's being shaded.
-
N: The normal at P. We often use the letters T and B to indicate the tangent and bitangent at P.
-
L: Light direction.
-
V: View direction.
-
Angle of Incidence: The angle between N and L.
-
Angle of Reflection: The angle between the reflected ray and the normal.