Adding Reflection and Refraction
Reading time: 6 mins.Another key benefit of ray tracing is its capacity to seamlessly simulate intricate optical effects such as reflection and refraction. These capabilities are crucial for accurately rendering materials like glass or mirrored surfaces. Turner Whitted pioneered the enhancement of Appel's basic ray-tracing algorithm to include such advanced rendering techniques in his landmark 1979 paper, "An Improved Illumination Model for Shaded Display." Whitted's innovation involved extending the algorithm to account for the computations necessary for handling reflection and refraction effects.

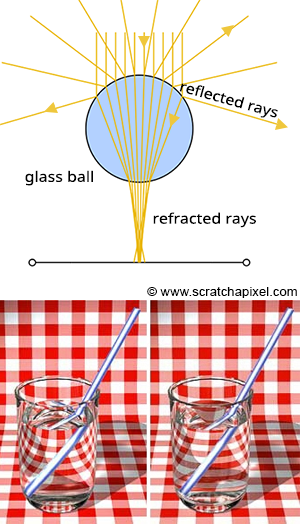
Reflection and refraction are fundamental optical phenomena. While detailed exploration of these concepts will occur in a future lesson, it's beneficial to understand their basics for simulation purposes. Consider a glass sphere that exhibits both reflective and refractive qualities. Knowing the incident ray's direction upon the sphere allows us to calculate the subsequent behavior of the ray. The directions for both reflected and refracted rays are determined by the surface normal at the point of contact and the incident ray's approach. Additionally, calculating the direction of refraction requires knowledge of the material's index of refraction. Refraction can be visualized as the bending of the ray's path when it transitions between mediums of differing refractive indices.
It's also important to recognize that materials like a glass sphere possess both reflective and refractive properties simultaneously. The challenge arises in determining how to blend these effects at a specific surface point. Is it as simple as combining 50% reflection with 50% refraction? The reality is more complex. The blend ratio is influenced by the angle of incidence and factors like the surface normal and the material's refractive index. Here, the Fresnel equation plays a critical role, providing the formula needed to ascertain the appropriate mix of reflection and refraction.

In summary, the Whitted algorithm operates as follows: a primary ray is cast from the observer to identify the nearest intersection with any scene objects. Upon encountering a non-diffuse or transparent object, additional calculations are required. For an object such as a glass sphere, determining the surface color involves calculating both the reflected and refracted colors and then appropriately blending them according to the Fresnel equation. This three-step process—calculating reflection, calculating refraction, and applying the Fresnel equation—enables the realistic rendering of complex optical phenomena.

To achieve the realistic rendering of materials that exhibit both reflection and refraction, such as glass, the ray-tracing algorithm incorporates a few key steps:
-
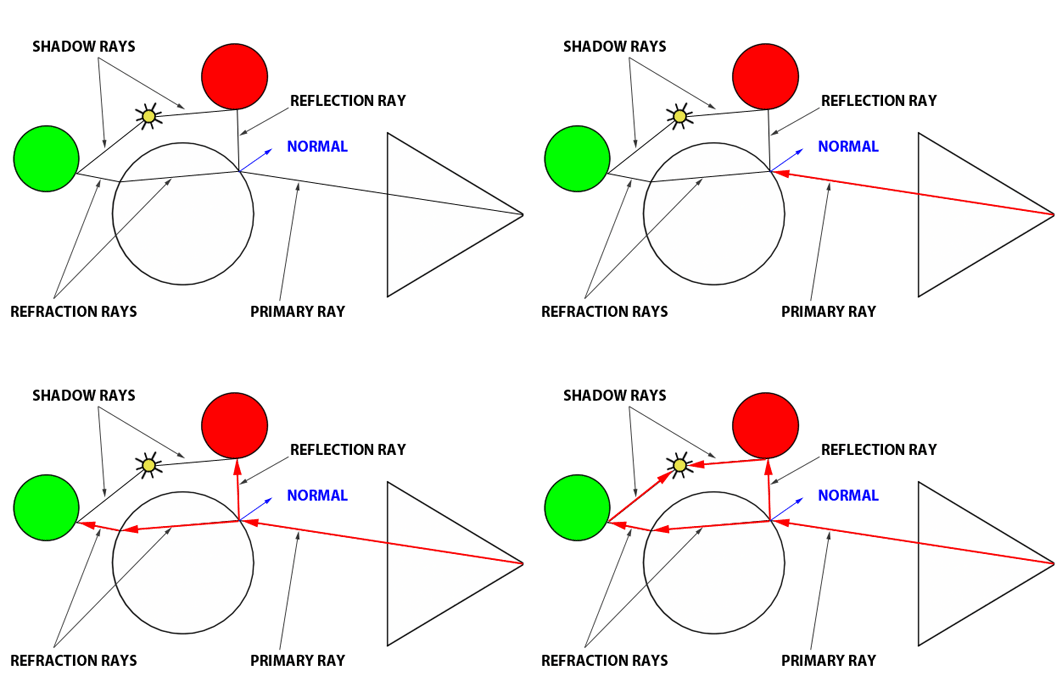
Reflection Calculation: The first step involves determining the direction in which light is reflected off an object. This calculation requires two critical pieces of information: the surface normal at the point of intersection and the incoming direction of the primary ray. With the reflection direction determined, a new ray is cast into the scene. For instance, if this reflection ray encounters a red sphere, we use the established algorithm to assess the amount of light reaching that point on the sphere by sending a shadow ray toward the light source. The color acquired (which turns black if in shadow) is then adjusted by the light's intensity before being factored into the final color reflected back to the surface of the glass ball.
-
Refraction Calculation: Next, we simulate the refraction effect, or the bending of light, as it passes through the glass ball, referred to as the transmission ray. To accurately compute the ray's new direction upon entering and exiting the glass, the normal at the point of intersection, the direction of the primary ray, and the material's refractive index are required. As the refractive ray exits the sphere, it undergoes refraction once more due to the change in medium, altering its path. This bending effect is responsible for the visual distortion seen when looking through materials with different refractive indices. If this refracted ray then intersects with, for example, a green sphere, local illumination at that point is calculated (again using a shadow ray), and the resulting color is influenced by whether the point is in shadow or light, which is then considered in the visual effect on the glass ball's surface.
-
Applying the Fresnel Equation: The final step involves using the Fresnel equation to calculate the proportions of reflected and refracted light contributing to the color at the point of interest on the glass ball. The equation requires the refractive index of the material, the angle between the primary ray and the normal at the point of intersection, and outputs the mixing values for reflection and refraction.
The pseudo-code provided outlines the process of integrating reflection and refraction colors to determine the appearance of a glass ball at the point of intersection:
// compute reflection color
color reflectionColor = computeReflectionColor();

// compute refraction color
color refractionColor = computeRefractionColor();

float Kr; // reflection mix value
float Kt; // refraction mix value

// Calculate the mixing values using the Fresnel equation
fresnel(refractiveIndex, normalHit, primaryRayDirection, &Kr, &Kt);

// Mix the reflection and refraction colors based on the Fresnel equation. Note Kt = 1 - Kr
glassBallColorAtHit = Kr * reflectionColor + Kt * refractionColor;
The principle that light cannot be created or destroyed underpins the relationship between the reflected (Kr) and refracted (Kt) portions of incident light. This conservation of light means that the portion of light not reflected is necessarily refracted, ensuring that the sum of reflected and refracted light equals the total incoming light. This concept is elegantly captured by the Fresnel equation, which provides values for Kr and Kt that, when correctly calculated, should sum to one. This relationship allows for a simplification in calculations; knowing either Kr or Kt enables the determination of the other by simple subtraction from one.
This algorithm's beauty also lies in its recursive nature, which, while powerful, introduces complexity. For instance, if the reflection ray from our initial glass ball scenario strikes a red sphere and the refraction ray intersects with a green sphere, and both these spheres are also made of glass, the process of calculating reflection and refraction colors repeats for these new intersections. This recursive aspect allows for the detailed rendering of scenes with multiple reflective and refractive surfaces. However, it also presents challenges, particularly in scenarios like a camera inside a box with reflective interior walls, where rays could theoretically bounce indefinitely. To manage this, an arbitrary limit on recursion depth is imposed, ceasing the calculation once a ray reaches a predefined depth. This limitation ensures that the rendering process concludes, providing an approximate representation of the scene rather than becoming bogged down in endless calculations. While this may compromise absolute accuracy, it strikes a balance between detail and computational feasibility, ensuring that the rendering process yields results within practical timeframes.