Writing a Basic Raytracer
Reading time: 6 mins.Many of our readers have reached out, curious to see a practical example of ray tracing in action, asking, "If it's as straightforward as you say, why not show us a real example?" Deviating slightly from our original step-by-step approach to building a renderer, we decided to put together a basic ray tracer. This compact program, consisting of roughly 300 lines, was developed in just a few hours. While it's not a showcase of our best work (hopefully) — given the quick turnaround — we aimed to demonstrate that with a solid grasp of the underlying concepts, creating such a program is quite easy. The source code is up for grabs for those interested.
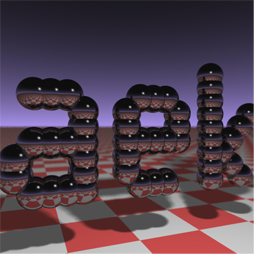
This quick project wasn't polished with detailed comments, and there's certainly room for optimization. In our ray tracer version, we chose to make the light source a visible sphere, allowing its reflection to be observed on the surfaces of reflective spheres. To address the challenge of visualizing transparent glass spheres—which can be tricky to detect due to their clear appearance—we opted to color them slightly red. This decision was informed by the real-world behavior of clear glass, which may not always be perceptible, heavily influenced by its surroundings. It's worth noting, however, that the image produced by this preliminary version isn't flawless; for example, the shadow cast by the transparent red sphere appears unrealistically solid. Future lessons will delve into refining such details for more accurate visual representation. Additionally, we experimented with implementing features like a simplified Fresnel effect (using a method known as the facing ratio) and refraction, topics we plan to explore in depth later on. If any of these concepts seem unclear, rest assured they will be clarified in due course. For now, you have a small, functional program to tinker with.
To get started with the program, first download the source code to your local machine. You'll need a C++ compiler, such as clang++, to compile the code. This program is straightforward to compile and doesn't require any special libraries. Open a terminal window (GitBash on Windows, or a standard terminal in Linux or macOS), navigate to the directory containing the source file, and run the following command (assuming you're using gcc):
c++ -O3 -o raytracer raytracer.cpp
If you use clang, use the following command instead:
clang++ -O3 -o raytracer raytracer.cpp
To generate an image, execute the program by entering ./raytracer into a terminal. After a brief pause, the program will produce a file named untitled.ppm on your computer. This file can be viewed using Photoshop, Preview (for Mac users), or Gimp. Additionally, we will cover how to open and view PPM images in an upcoming lesson.
Below is a sample implementation of the traditional recursive ray-tracing algorithm, presented in pseudo-code:
#define MAX_RAY_DEPTH 3

color Trace(const Ray &ray, int depth)
{
    Object *object = NULL;
    float minDistance = INFINITY;
    Point pHit;
    Normal nHit;
    for (int k = 0; k < objects.size(); ++k) {
        if (Intersect(objects[k], ray, &pHit, &nHit)) {
            float distance = Distance(ray.origin, pHit);
            if (distance < minDistance) {
                object = objects[k];
                minDistance = distance;
            }
        }
    }
    if (object == NULL)
        return backgroundColor; // Returning a background color instead of 0
    // if the object material is glass and depth is less than MAX_RAY_DEPTH, split the ray
    if (object->isGlass && depth < MAX_RAY_DEPTH) {
        Ray reflectionRay, refractionRay;
        color reflectionColor, refractionColor;
        float Kr, Kt;

        // Compute the reflection ray
        reflectionRay = computeReflectionRay(ray.direction, nHit, ray.origin, pHit);
        reflectionColor = Trace(reflectionRay, depth + 1);

        // Compute the refraction ray
        refractionRay = computeRefractionRay(object->indexOfRefraction, ray.direction, nHit, ray.origin, pHit);
        refractionColor = Trace(refractionRay, depth + 1);

        // Compute Fresnel's effect
        fresnel(object->indexOfRefraction, nHit, ray.direction, &Kr, &Kt);

        // Combine reflection and refraction colors based on Fresnel's effect
        return reflectionColor * Kr + refractionColor * (1 - Kr);
    } else if (!object->isGlass) { // Check if object is not glass (diffuse/opaque)
        // Compute illumination only if object is not in shadow
        Ray shadowRay;
        shadowRay.origin = pHit + nHit * bias; // Adding a small bias to avoid self-intersection
        shadowRay.direction = Normalize(lightPosition - pHit);
        bool isInShadow = false;
        for (int k = 0; k < objects.size(); ++k) {
            if (Intersect(objects[k], shadowRay)) {
                isInShadow = true;
                break;
            }
        }
        if (!isInShadow) {
            return object->color * light.brightness; // point is illuminated
        }
    }
    return backgroundColor; // Return background color if no interaction
}

// Render loop for each pixel of the image
for (int j = 0; j < imageHeight; ++j) {
    for (int i = 0; i < imageWidth; ++i) {
        Ray primRay;
        computePrimRay(i, j, &primRay); // Assume computePrimRay correctly sets the ray origin and direction
        pixels[i][j] = Trace(primRay, 0);
    }
}

A Minimal Ray Tracer
The concept of condensing a ray tracer to fit on a business card, pioneered by researcher Paul Heckbert, stands as a testament to the power of minimalistic programming. Heckbert's innovative challenge, aimed at distilling a ray tracer into the most concise C/C++ code possible, was detailed in his contribution to Graphics Gems IV. This initiative sparked a wave of enthusiasm among programmers, inspiring many to undertake this compact coding exercise.
A notable example of such an endeavor is a version crafted by Andrew Kensler. His work resulted in a visually compelling output, as demonstrated by the image produced by his program. Particularly impressive is the depth of field effect he achieved, where objects blur as they recede into the distance. The ability to generate an image of considerable complexity from a remarkably succinct piece of code is truly remarkable.
// minray > minray.ppm
#include <stdlib.h>
#include <stdio.h>
#include <math.h>
typedef int i;typedef float f;struct v{f x,y,z;v operator+(v r){return v(x+r.x,y+r.y,z+r.z);}v operator*(f r){return v(x*r,y*r,z*r);}f operator%(v r){return x*r.x+y*r.y+z*r.z;}v(){}v operator^(v r){return v(y*r.z-z*r.y,z*r.x-x*r.z,x*r.y-y*r.x);}v(f a,f b,f c){x=a;y=b;z=c;}v operator!(){return*this*(1/sqrt(*this%*this));}};i G[]={247570,280596,280600,249748,18578,18577,231184,16,16};f R(){return(f)rand()/RAND_MAX;}i T(v o,v d,f&t,v&n){t=1e9;i m=0;f p=-o.z/d.z;if(.01<p)t=p,n=v(0,0,1),m=1;for(i k=19;k--;)for(i j=9;j--;)if(G[j]&1<<k){v p=o+v(-k,0,-j-4);f b=p%d,c=p%p-1,q=b*b-c;if(q>0){f s=-b-sqrt(q);if(s<t&&s>.01)t=s,n=!(p+d*t),m=2;}}return m;}v S(v o,v d){f t;v n;i m=T(o,d,t,n);if(!m)return v(.7,.6,1)*pow(1-d.z,4);v h=o+d*t,l=!(v(9+R(),9+R(),16)+h*-1),r=d+n*(n%d*-2);f b=l%n;if(b<0||T(h,l,t,n))b=0;f p=pow(l%r*(b>0),99);if(m&1){h=h*.2;return((i)(ceil(h.x)+ceil(h.y))&1?v(3,1,1):v(3,3,3))*(b*.2+.1);}return v(p,p,p)+S(h,r)*.5;}i main(){printf("P6 512 512 255 ");v g=!v(-6,-16,0),a=!(v(0,0,1)^g)*.002,b=!(g^a)*.002,c=(a+b)*-256+g;for(i y=512;y--;)for(i x=512;x--;){v p(13,13,13);for(i r=64;r--;){v t=a*(R()-.5)*99+b*(R()-.5)*99;p=S(v(17,16,8)+t,!(t*-1+(a*(R()+x)+b*(y+R())+c)*16))*3.5+p;}printf("%c%c%c",(i)p.x,(i)p.y,(i)p.z);}}
To execute the program, start by copying and pasting the code into a new text document. Rename this file to something like minray.cpp or any other name you prefer. Next, compile the code using the command c++ -O3 -o minray minray.cpp or clang++ -O3 -o minray minray.cpp if you choose to use the clang compiler. Once compiled, run the program using the command line minray > minray.ppm. This approach outputs the final image data directly to standard output (the terminal you're using), which is then redirected to a file using the > operator, saving it as a PPM file. This file format is compatible with Photoshop, allowing for easy viewing.
The presentation of this program here is meant to demonstrate the compactness with which the ray tracing algorithm can be encapsulated. The code employs several techniques that will be detailed and expanded upon in subsequent lessons within this series.