An Introduction to Volume Rendering
Reading time: 22 mins.Preamble: Structure of this Lesson and Approach
This lesson was written around 2022. While this isn't a very long time (by the time this update note is written, it's August 2024), I wrote this lesson a bit in a hurry after a break of many years (more than 8) during which I had left the website alone.
The reason this lesson is important is that when I started Scratchapixel, I promised myself that the project wouldn't be considered complete, at least in its first phase, until I had written the lesson on Volume Rendering. This is a topic to which I dedicated a fair amount of my professional career, and it is why it was also somehow important to me. While the first revision of this lesson is okay, I realize over time that it could be better, and I will eventually keep working on it.
In addition, this lesson focuses on implementing volume rendering through a technique called ray-marching. While this method is not necessarily considered outdated, it is not as widely used in modern production rendering software, which prefers a method called the delta tracking method. However, the ray-marching method was, for a long time, the de facto standard used by these software for rendering volumes, so there's no shame in learning about this method as a starting point. I believe it's okay for readers to start from here because it's simpler and makes it easier to understand the necessary mathematical foundations upon which more advanced methods are built.
In summary:
-
This lesson is in a constant process of being improved.
-
This lesson focuses on the ray-marching technique but will be followed by another one that will look into more modern methods such as the delta tracking method.
Volume rendering (technically, using the term participating media instead of the term volume would be better) is a topic almost as large and as complex as hard surface rendering. It has its own set of equations, which are, in fact, almost a generalization of the equations used to describe how light interacts with hard matter. They can be overwhelming for readers who are not necessarily comfortable with such complex mathematical formulations.
True to the way we teach things on Scratchapixel, we chose a "bottom-up" approach to the challenge of teaching volume rendering. Or to say it differently, a practical approach. Rather than starting from the equations and diving into them, we will instead write code to render a simple volumetric sphere and explain things along the way in a hopefully intuitive way. Then, everything we learned to that point will be summed up and formalized at the end of the lesson.
Several lessons will be devoted to volume rendering (it is a vast topic). In this introductory lesson, we will study the foundations of volume rendering and ray-marching. The next lessons will be devoted to other possible methods for rendering volumes, global illumination applied to participating media, multiple scattering, formats used to store volume data such as OpenVDB, etc.
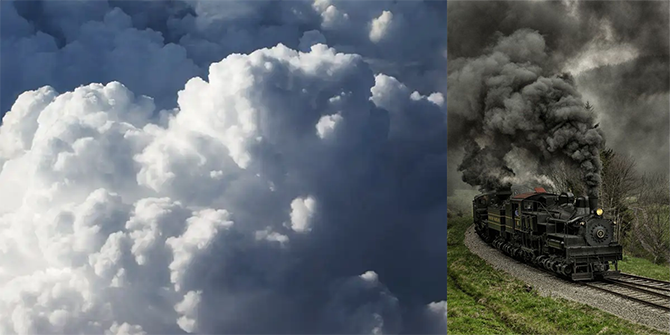
If you are interested in volume rendering, you might also want to check the lesson Simulating the Colors of the Sky. The sky is a kind of volume.
Introduction
Our aim in the first two chapters of this lesson is to learn how to render a volume shaped like a sphere illuminated by a single light source on a uniformly colored background. This will help us get a first intuitive understanding of what volumes are and introduce the ray-marching algorithm that we will use to render them.
In this particular chapter, we will just render a plain volume with uniform density. We will ignore shadows cast by objects from outside or from within the volume, as well as how to render volumes with varying densities. These will be studied in the next chapters.
Instead of providing a lot of detailed background about what volumes are and the equations used to render them, let's dive straight into implementation and derive a more formal understanding of volume rendering from there.
Internal Transmittance, Absorption, Particle Density, and Beer's Law
Light reaching our eyes as a result of being reflected by an object or emitted by a light source is likely to be absorbed as it travels through a volume of space filled with particles. The more particles in the volume, the more opaque the volume becomes. From this simple observation, we can establish some fundamental concepts related to volume rendering: absorption, transmission, and the relationship between a volume's opacity and the density of particles it contains. For now, we will consider that the density of particles in the volume is uniform.
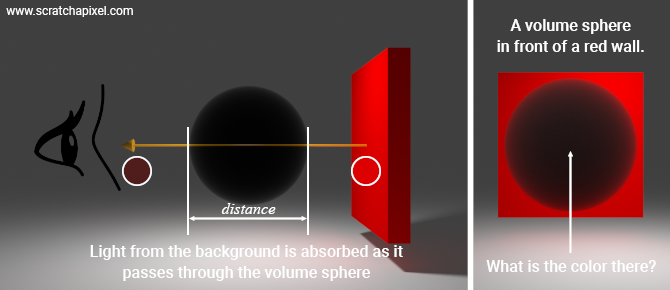
As light travels through the volume towards our eye (which is how images of objects we see are formed), some of it will be absorbed by the volume. This phenomenon is called absorption. What we are interested in, for now, is the amount of light transmitted from the background through the volume. We speak of internal transmittance (the amount of light being absorbed by the volume as it travels through it). Internal transmittance can be seen as a value ranging from 0 (the volume blocks all light) to 1 (in a vacuum, all light is transmitted).
The amount of light transmitted through that volume is governed by the Beer-Lambert law (or Beer's law for short). In the Beer-Lambert law, the concept of density is expressed in terms of the absorption coefficient (and scattering coefficient, which we will introduce later in this chapter). Essentially, "the denser the volume, the higher the absorption coefficient"; and as you can guess intuitively, the volume becomes more opaque as the absorption coefficient increases. The Beer-Lambert law equation is:
$$ T = \exp(-\text{distance} \times \sigma_a) = e^{-\text{distance} \times \sigma_a} $$The law states that there is an exponential dependence between the internal transmittance, \(T\), of light through a volume and the product of the absorption coefficient of the volume, \(\sigma_a\) (the Greek letter sigma), and the distance the light travels through the material (i.e., the path length).
The unit of these coefficients is a reciprocal distance or inverse length such as \(cm^{-1}\) or \(m^{-1}\) (this is just a matter of scale). This is important because it helps get an intuitive sense of what information these coefficients hold. You can consider the absorption coefficient (and the scattering coefficient, which we will introduce later) as a probability or likelihood that a random event occurs (e.g., the photon is absorbed or scattered) at any given point/distance.
The absorption and scattering coefficients are said to express a probability density (in case you want to do more research on this topic). As it is a probability, it should not exceed 1; however, this depends on the unit in which it is measured. For example, if you used millimeters, you might get 0.2 for a given medium. But expressed in centimeters and meters, this would become 2 and 20 respectively. So in practice, nothing stops you from using values greater than 1.
Relationship between the coefficients and the mean free path.
The fact that the unit of the absorption and scattering coefficients is inverse length is important because if you take the inverse of the coefficients (1 over the absorption or scattering coefficient), you get a distance. This distance, called the mean free path, represents the average distance at which a random event occurs:
$$ \text{mean free path} = \frac{1}{\sigma_s} $$This value plays an important role in simulating multiple scattering in participating media. Check the lessons on subsurface scattering and advanced volume rendering to learn more about these very cool topics.
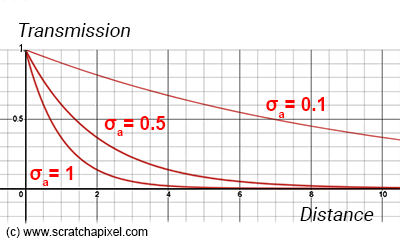
The greater the absorption coefficient or the distance, the smaller \( T \). The Beer-Lambert law equation returns a number in the range 0-1. If the distance or the absorption coefficient is 0, the equation returns 1. For very large values of either the distance or the density, \( T \) gets closer to 0. For a fixed distance, \( T \) decreases as we increase the absorption coefficient. For a fixed absorption coefficient, \( T \) decreases as we increase the distance. The further light travels in the volume, the more it gets absorbed. The more particles in the volume, the more light gets absorbed. Simple. You can see this effect in Figure 1.
Beer & gemstones.
An absorbing-only medium is transparent (not translucent) but dims images seen through it (e.g., beer, wine, gemstones, tinted glass).
Rendering a Volume Over a Uniform Background
It's easy to start from here. Imagine we have a slab of volume whose thickness and density are known, say 10 and 0.1, respectively. Then, if the background color (light reflected by a wall, for example, that we are looking at) is \((xr, xg, xb)\), how much of that background color we see through the volume is:
vec3 background_color {xr, xg, xb};
float sigma_a = 0.1; // absorption coefficient
float distance = 10;
float T = exp(-distance * sigma_a);
vec3 background_color_through_volume = T * background_color;
It cannot be simpler.
Scattering
Note that until now, we have assumed that our volume is black. In other words, we just darken the background color wherever our slab is. But the volume doesn't have to be black. Like solid objects, volumes reflect (or scatter, more precisely) light too. That's why, when you look at a cloud on a sunny day, you can see the shape of the cloud almost as if it were a solid object. Volumes can also emit light (think of a candle flame), which we are mentioning for the sake of completeness, but we will ignore emission in this chapter.
So let's assume our slab of volume has a certain color, say \((xr, xg, xb)\). We will ignore where that color comes from for now and explain it later in the chapter. Let's just say that our volume has some color as a result of the volumetric object "reflecting" light (not really, but let's go with the concept of "reflection" like with solid objects for now) that's illuminating it, like with solid objects. Then our code becomes:
vec3 background_color {xr, xg, xb};
float sigma_a = 0.1;
float distance = 10;
float T = exp(-distance * sigma_a);
vec3 volume_color {yr, yg, yb};
vec3 background_color_through_volume = T * background_color + (1 - T) * volume_color;
Think of it as the process of blending (A+B) images in Photoshop, for example, using alpha blending. Say you want to add image B over A, where A is the background image (our blue wall) and B is the image of a red disk with a transparency channel. The formula to combine these two images would be:
$$ C = (1 - B.\text{transparency}) * A + B.\text{transparency} * B $$Here, transparency is \(1 -\) transmission (also called opacity), and B is the color of our volume object (light that's being "reflected" by the volume and traveling towards our eyes/camera). We will get back to this when we discuss the ray-marching algorithm; for now, keep this in mind.
Rendering our First Volume Sphere
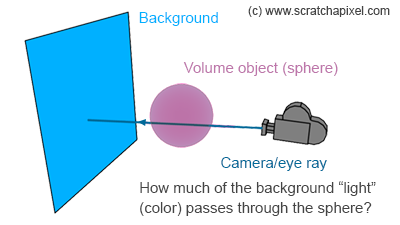
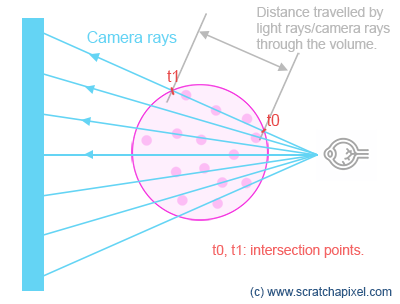
We have all we need to render our first 3D image. We will render a sphere that we assume is filled with some particles using what we have learned so far. We will assume that we are rendering our sphere over some background. The principle is very simple. We first check for an intersection between our camera ray and the sphere. If there's no intersection, then we simply return the background color. If there is an intersection, we then calculate the points on the surface of the sphere where the ray enters and leaves the sphere. From there, we can compute the distance that the ray travels through the sphere and apply Beer's law to compute how much of the light is being transmitted through the sphere. We will assume that light "reflected" (scattered) by the sphere is uniform for now. We will look at lighting later.
Implementation detail.
Technically, we don't need to compute the points where the ray enters and leaves the sphere to get the distance between the points. We simply need to subtract tmin from tmax (the ray parametric distances along the camera ray where the ray intersects the sphere). In the following example, we calculate them to emphasize that what we care about here is the distance between these two points.
class Sphere : public Object
{
public:
    bool intersect(vec3 ray_origin, vec3 ray_direction, float &t0, float &t1) const {
        // compute ray-sphere intersection
    }
    float sigma_a{ 0.1 };
    vec3 scatter{ 0.8, 0.1, 0.5 };
    vec3 center{ 0, 0, -4 };
    float radius{ 1 };
};

vec3 traceScene(vec3 ray_origin, vec3 ray_direction, const Sphere *sphere)
{
    float t0, t1;
    vec3 background_color { 0.572, 0.772, 0.921 };
    if (sphere->intersect(ray_origin, ray_direction, t0, t1)) {
        vec3 p1 = ray_origin + ray_direction * t0;
        vec3 p2 = ray_origin + ray_direction * t1;
        float distance = (p2 - p1).length();  // though you could simply do t1 - t0
        float transmission = exp(-distance * sphere->sigma_a);
        return background_color * transmission + sphere->scatter * (1 - transmission);
    }
    else {
        return background_color;
    }
}

void renderImage()
{
    Sphere *sphere = new Sphere;
    for (each row in the image) {
        for (each column in the image) {
            vec3 ray_dir = computeRay(col, row);
            vec3 pixel_color = traceScene(ray_origin, ray_dir, sphere);
            image_buffer[...] = pixel_color;  // store pixel color in image buffer
        }
    }
    saveImage(image_buffer);
    //...
}
Quite logically, as the density increases, the transmission gets closer to 0, which means that the color of the volumetric sphere dominates over that of the background.
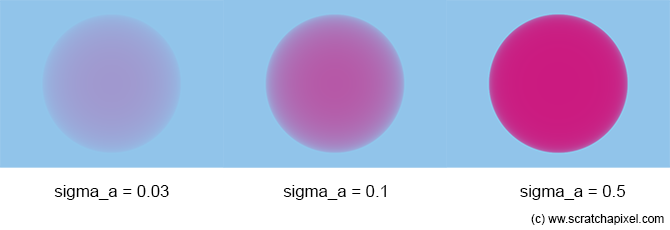
You can see in the images above that the volume gets more opaque towards the center of the sphere, where the distance traveled by the ray through the sphere is the greatest. You can also see that as the density increases (as sigma_a increases), the sphere becomes more opaque overall. Eureka! You've just rendered your first volumetric sphere and you are halfway to becoming a volume rendering expert.
Let's Add Light! In-Scattering
So far, we have a nice image of a volumetric sphere, but what about lighting? If we shine a light onto a volumetric object, we can see that parts of the volume more directly exposed to light are brighter than those in shadows. Volumes, like solid objects, are illuminated by lights. How do we account for that?
The principle is very simple. Let's imagine the fate of light emitted by a light source traveling through the volume. As it travels through the volume, its intensity gets attenuated due to absorption. And not surprisingly, how much is left of the light energy after it has traveled a certain distance in the volume is ruled by Beer's law. In other words, if we know the distance light traveled through the volume, its intensity at that distance is:
float light_intensity = 10; // just a number, it could be anything
float T = exp(-distance_travelled_by_light * volume->absorption_coefficient);
float light_intensity_attenuation = T * light_intensity;
Light energy decreases as it travels through the volume according to Beer's law, as we've just learned above. That makes sense. But something else also happens: light travels in the direction in which it was emitted, and along this path, some of it is absorbed, but some of it is also scattered in a direction different from the direction in which it was initially emitted. If that direction corresponds to the direction opposite to the viewing direction, then this light will hit your eye or the surface of the camera's sensor. This is very similar to the process of light being reflected from the surface of a solid object, but it has a few interesting nuances.
As a cloud is not a solid object, if light hits a particle, two things can happen:
-
It can be absorbed.
-
It can be scattered. We don't speak of reflection when it comes to volumes; we prefer to speak of scattering. Light gets scattered.
If the light doesn't hit a particle in the volume, it keeps traveling in the same direction, of course. The probability of light being absorbed vs. scattered is not something we are going to be concerned about just right now. The point you need to pay attention to at this point is that if the light is scattered in the direction opposite to the viewing direction, then this part of the light that was emitted by the light source will eventually hit your eyes even though it wasn't initially (when emitted by the light) traveling along that direction. This effect is called in-scattering. In-scattering refers to light passing through a volume that is redirected toward the eyes due to a scattering event.
This effect is illustrated in Figure 4. A scattering event is the result of an interaction between a photon and a particle/atom making up the medium/volume. Rather than being absorbed, the atom "spits out" the photon in a direction different from its incoming direction (if the volume is made out of atoms such as water or smoke) or reflects off tiny particles if the smoke contains such small solid particles (such as dust, soot, sea salt, etc.). We will learn more about this phenomenon in the next chapters.
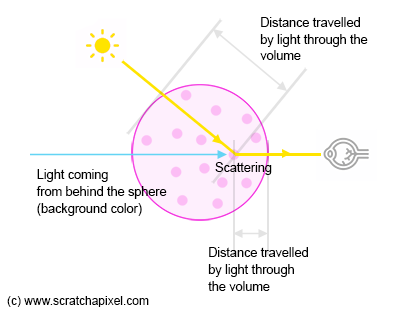
If you look at Figure 4, note that light arriving at the eye (along the particular eye/camera ray that is drawn in blue in the figure) is a combination of light coming from the background (our blue background) and light coming from the light source scattered toward the eye due to in-scattering (the yellow ray).
The appearance of a volume, which is the volume as you see it from a given point of view, is thus the combination of light being absorbed, where light can be that of the background visible directly along the line of sight passing through it, or light emitted by various light sources in the scene, illuminating the cloud from all possible directions. To generate a realistic image of a cloud, we thus need to take into consideration these two effects. We've already looked into absorption and so now need to consider how to account for the in-scattering effect.
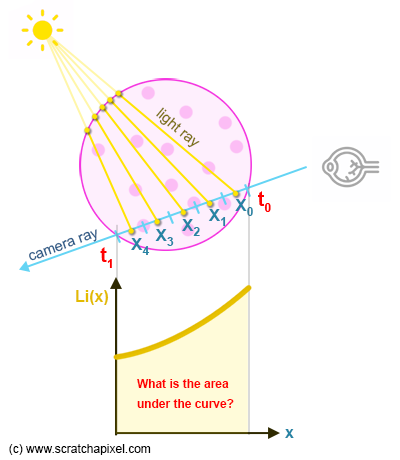
The goal is to somehow find a way of measuring light that's being scattered toward the eye (along with the camera rays) as a result of the in-scattering effect. The problem, though, is as follows: Light scattered along the line of sight can happen anywhere between \( t_0 \) and \( t_1 \), which defines the limits within which light traveling towards the eye, along the camera ray (or opposite to the camera's ray direction more precisely), does so within the sphere's boundaries. This is not a discrete process where particles of light fall at specific locations along the segment defined by \( t_0 \) and \( t_1 \). No, it's a phenomenon where light being absorbed and scattered is happening continuously along that segment. How do we then measure such a continuous influx of light energy along a given distance?
Before we look into the solution to this problem, let's agree on some notation first. We will define \( L_i(x, \omega) \) as a function that gives us how much light is being scattered towards the eye's direction, defined by the Greek letter \(\omega\) (omega), in terms of radiance (please check the lesson on the rendering equation if you are not familiar with radiometric units), where \( x \) defines any point on the segment \( t_0 \) to \( t_1 \).
When in physics you need to represent an influx of some kind of energy over some distance or some volume, we express this measure using an integral. In other words, what we want here is to integrate the function \( L_i(x, \omega) \) over the range \( t_0 \) to \( t_1 \), and the resulting number is essentially what we are looking for. If you are not too familiar with the concept of an integral, you can read it as "collect all light energy being scattered along the ray with direction \(\omega\) between the parametric distances \( t_0 \) and \( t_1 \)." If these quantities were discrete, we would just sum them up, but when functions are continuous, such as with \( L_i \), we then express this idea with an integral. Practically, this integral is written as follows:
$$\int_{x=t_0}^{t_1} Li(x, \omega) dx$$We won't redo a lesson on integrals here. If you are unfamiliar with the concept of integrals and the most common methods to evaluate them, check the lesson Mathematics of Shading. But let's remind ourselves here that an integral measures the area below the curve of the function that's being integrated. In the case of a \( y=f(x) \) function, that is a function that defines a curve, not a surface, in which case it would be measuring a volume.
The problem is that there's no analytical solution to the integral we need to calculate a value for. There could be one for volumes with simple shapes such as a sphere and for simple lighting scenarios, but since we want a solution that works for any volume shapes, including non-homogeneous volumes, as we will see later in the lesson, and under any lighting scenario, there's no point in going down this path. So what shall we do? We will do what we do most of the time in experimental and practical physics and computer graphics (when it comes to making images for films or video games, at least, as the fate of the world doesn't depend on our calculations): we will use a technique for approximating this integral known as the Riemann sum method.
The idea behind the Riemann sum is simple. We can break the area under the curve down into simpler shapes whose area we know, like rectangles (Figure 7). We then sample \( L_i(x, \omega) \) along the curve at regular intervals whose width we know (\( dx \)), and the area of the resulting rectangle can then be computed as \( L_i(x, \omega) \) multiplied by \( dx \) (where \( x \) is in the middle of the interval). By summing up the area of all the rectangles, we get an approximation of the area under the curve (as you can see in Figure 7). Et voila! As said, the result is not exactly the area under the curve, but just an approximation, which is hopefully clear when you look at Figure 7. And as you may intuitively understand, the smaller the width of the rectangles (the smaller \( dx \)), the closer we get to the true area under the curve (but the longer the processing time).
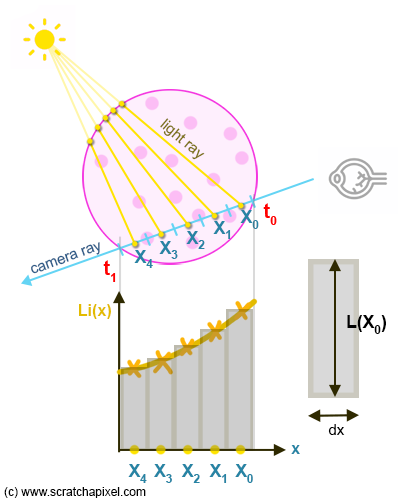
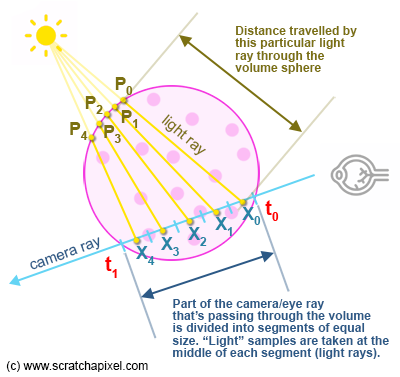
How does it work in practice, applied to our volume rendering problem? Well, this is what we shall see in the next chapter. But as you may have guessed and as a teaser, it will essentially come back to dividing the segment of the camera ray contained within the boundary of the sphere into smaller segments of length \( dx \). For each of these sub-segments, we will calculate the function \( L_i(x, \omega) \). This involves (Figure 5):
-
Shooting a ray from \( x \), located in the middle of the sub-segment, in the direction of the light to see where it leaves the volume object. This will give us the distance light has traveled through the volume from the light to arrive at \( x \).
-
Using that distance, we can then apply Beer's law to know how much of the light energy is left after traveling that distance through the volume.
We then multiply \( L_i(x, \omega) \) by \( dx \) and accumulate the contribution of each small segment. And that's it.
However, the astute reader will realize that there's one question to which we didn't respond. In fact, two observations should be made:
-
Hey, sorry, but we do know how much light arrives at \( x \), the sample location, from the light source now. That's fine. But that doesn't tell us what fraction of that light is eventually in-scattered in the direction \( \omega \). Good point. You indeed don't yet have the full picture of what \( L_i(x, \omega) \) does. In other words, we've looked into the \( L_i(x) \) part but haven't yet used the \( \omega \) variable, which, as you guessed, plays a role in the calculation of that fraction.
-
Secondly, isn't the light being scattered along \( \omega \) being itself absorbed while traveling from \( x \) to \( t_0 \)? In other words, assuming \( x \) is inside the volume (which it is), it still needs to travel some distance within the volume before leaving the volume and reaching my eyes. So I assume that over the distance traveled in the volume, this light is absorbed as well. Yep!
Well, if you managed to intuit these two observations, good job to you and kudos to us. That means you are ready to move on to the next chapter where we will address them.