Distant Lights
Reading time: 9 mins.Distant Light, aka the Sun
Simulating distant lights is very simple, making this chapter short. In fact, it's the simplest, most basic form of light one can implement (and probably the first type of light you implement to get something working).
But what is a distant light? In truth, true distant light doesn't exist in nature. It's a type of light where the emitted rays are parallel to each other. In the real world, most (if not all, but since I haven't traveled elsewhere in the universe, I wouldn't swear that's 100% certain) light sources have some physical shape from which light is emanating and consequently, light is generally emitted radially. Consider our sun, for instance, which is a ball of fire. Well, in ancient Greek mythology, it's seen that way. For a modern scientist, it's probably more complex than that.
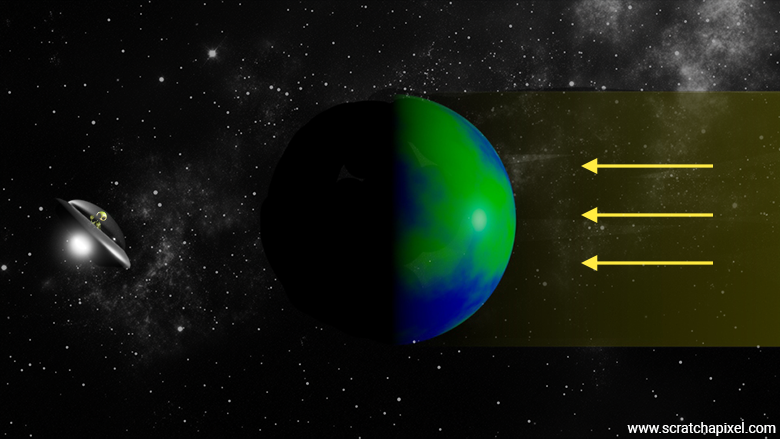
But the point is, the sun can be modeled as a ball emitting light in all directions. The problem is that our planet, Earth, is so far away from the sun that the light hitting our planet from the sun is contained within a very narrow beam of direction. So narrow that, at the cosmological scale, beams traveling within that cone can be considered as (almost) parallel to each other. This is essentially what the distant light in the computer graphics world is trying to achieve: simulating the effect of sunlight on Earth. And again, it might be more accurate to simulate the sun as a spherical light (which we will discuss later in this lesson). However, before the democratization of area lights, thanks to increasing computational power, we didn't bother doing so. As light rays were considered to be parallel to each other, all we needed was a direction. To keep going with the sun's analogy, you can think of it as the direction your finger points to when you orient it toward the sun to show someone where it is in the sky.
Note that some architectural software proposes to figure out the position of the sun in the sky in a physically accurate way. You input a year, a month, a day, and an hour, and the system computes the position of the sun in the sky with cosmic precision. The reason it's capable of doing so is that the equations for predicting the position of the sun with respect to Earth based on the date and time of the day have been known for centuries. What we still fail to predict is the weather on that day).
So, as you can see, all you need to simulate a distant light is a direction.
class SunLight : class Light {
public:
	Vec3<float> direction_{0,1,0}; // zenith
	Vec3<float> light_color_{1};
}
Implementation of Distant Light
From an implementation standpoint, all you need to do is shoot a shadow ray in the light's direction to determine if the point you are shading is in the shadow of some object along that direction. You can shoot that ray to infinity if you want to, where infinity here is within the context of a floating point value, that is the biggest number that a float (or double, if you decide to use doubles instead) can hold.
// origin, direction, tmin and tmax
Ray shadow_ray(x, light->direction_, 0, std::numeric_limits<float>::max());
if (!occlusion(scene, shadow_ray)) {
    L += albedo / M_PI * light->light_color_ * std::max(0.f, std::cosf(N, light->direction_));
}
As you can see with the code above, we cast a shadow ray into the scene. If there's no occlusion (occlusion returns false), then we can accumulate the contribution of this light to the overall brightness of our shaded point. If you are not familiar with the concept of light accumulation and light loops, check the last chapter of this lesson. That's it! That's really all there is to this light type.
Artistic Considerations
From an artistic or stylistic point of view, using a sunlight or not matters.
-
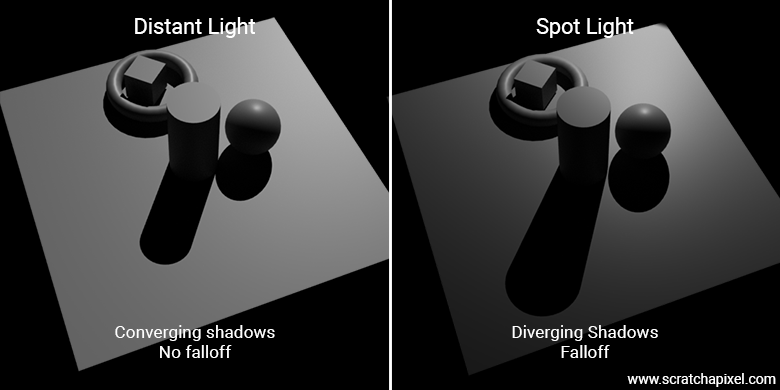
Converging vs. Diverging shadows: Indeed, as you can see with the next two images, because light rays are parallel when using a distant light, the shadow cast by such light ends up having a very different shape than the shape of a shadow produced by a spherical light, be it a point or a spotlight. As humans are very much used to seeing shadows cast by our sun, it is recommended to use a distant light if you want to make images representing an outdoor sun-exposed scene. It will generate shadows whose shapes will feel more familiar to your brain than if you had attempted to simulate that effect with, say, a spotlight. Studios like Pixar or DreamWorks pay a great deal of attention to such details when they come to illuminating their scenes and making the right choice of light type to simulate the right type of effect in the most believable way (even if the look and feel of the finished image remains stylized). Shadows contribute significantly to structuring the image from a visual standpoint and carry with them special meaning which can underline what's happening in the story from an emotional standpoint. They contribute to a visual grammar used in film and storytelling.
-
Lack of Falloff: It's not that the sun escapes all laws of physics and isn't affected by the inverse square law. It's more that the size of the Earth relative to the distance of the sun makes the attenuation of light over human-scale distances negligible. In other words, if you measure the sunlight arriving where you stand on the ground compared to the amount of light arriving 10 meters or even 1000 meters away from you in the direction of the sun, the difference in light energy is unlikely to be measurable unless you have extremely precise instruments. So, at least when it comes to making images for movies and video games, this is something we can ignore. This has a profound effect on the way images look, as this means that, compared to other light types such as point and spotlights, sunlight does not have any falloff.
-
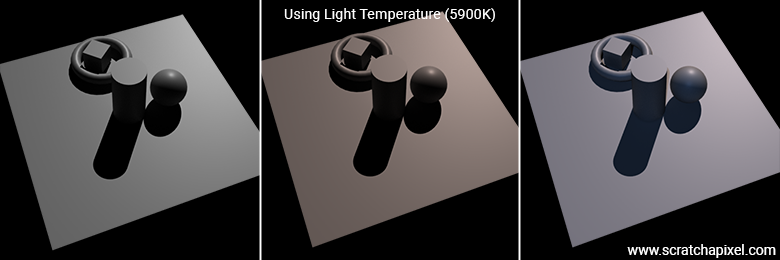
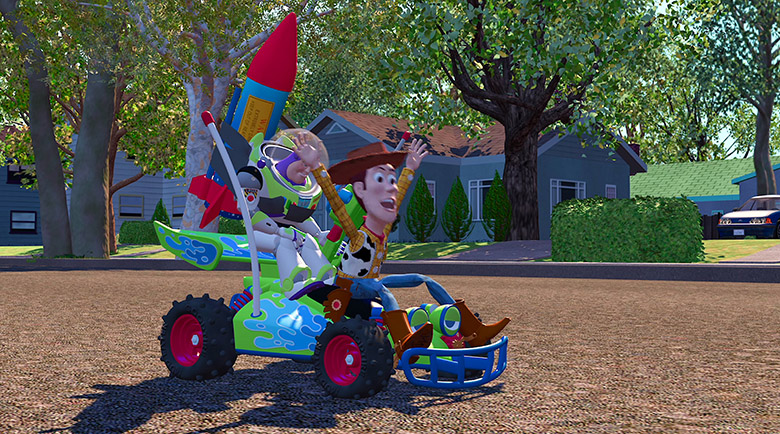
Color Temperature: Every light has a color temperature, but we generally don't set the light color based on temperature. Rather, artists or people using 3D software would just tweak the light color to get the desired effect. However, if you want to simulate sunlight, you should remember that the temperature of sunlight is about 5900 degrees Kelvin. How light temperature relates to color can be found in the lesson on blackbodies. From an artistic standpoint, this means that sunlight has an reddish tone to it. The following images show the difference between a purely white light color (left) and sunlight whose color was derived from temperature (middle). Of course, sunlight in the real world doesn't feel so red, but that's also because the color of the sky (bluish) compensates for that orangey-reddish color, making it look more neutral. This is also why shadows in outdoor scenes appear bluish, which is visible in the Toy Story image below. They have replicated this effect with lights.
Pixar makes extensive use of such visual cues and has published over the years several articles that explain how they use lights to convey various moods in their movies. I hope to have time one day to resurrect some of these old articles and bring them to light again. The rules they explain are timeless, but unfortunately, these documents have been buried in the internet archives (Image courtesy of Pixar, from Toy Story released in 1995).
Relevance of Distant Light in Modern Rendering
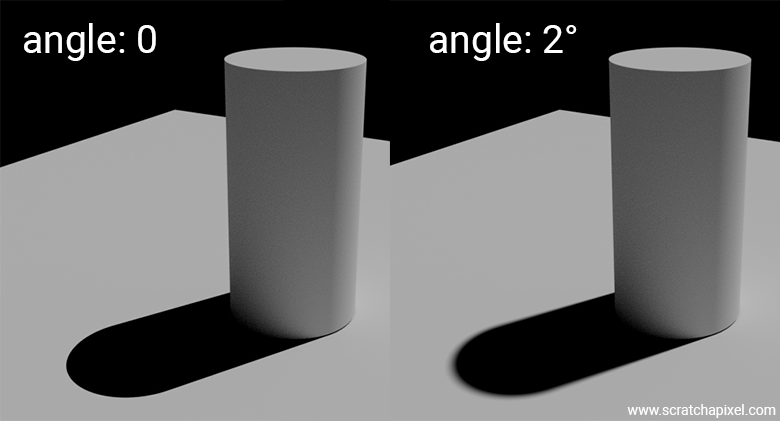
As another side note, you might wonder if, with the advent of more physically-based renderers and supercomputers, using distant lights is still relevant. Why not just use very small spherical or disk-shaped area lights? This is a good question. In fact, many renderers, such as Arnold, propose a parameter on the distant light which allows you to distribute the shadow rays within a very small angle (whose value you can set, so you can experiment with different ones). Indeed, the sun is not strictly speaking a point in 3D space. From the point of view of planet Earth, it is still perceived as a small disk with a subtended angle \(\theta\) of roughly 0.5 degrees. You can easily calculate this angle by considering the distance between the Earth and the sun and the sun's diameter. So instead of placing a spherical or disk area light with a very large radius and super far away from your scene, so that it looks small from your scene point of view (and casts mostly parallel rays), which is feasible but could potentially cause errors related to floating point precision, the preferred approach is to generally distribute the shadow rays within a very small cone of direction of roughly more than 0.5 degrees. This will help you break the very sharp shadows generated by a typical distant light. Looking at outdoor scenes, you will observe that shadows all have some softness to them at the edges.
We won't provide an implementation of the cone angle feature here, but the chapter Spherical Area Lights: Using Cone Sampling provides the explanation and source code necessary to implement it. All you need is to sample the cone of directions with an opening angle of, say, 0.5 degrees, and all information for doing so is provided in that chapter.
With this being said, this concludes our series of chapters devoted to distant lights. It's time we dive into the world of area lights.